![]()
![]()
![]()
Today I look at the Network File System (NFS), a set of protocols and products in wide use with TCP/IP-based networks. NFS is especially popular with UNIX networks, but it is now available for many platforms and works well across a local area network. I also look at several protocols that are closely associated with NFS, such as Network Information Service (NIS), and the Remote Execution Service (REX).
Today's text concentrates on the UNIX versions of these protocols, simply because they serve as an excellent illustration. For other operating systems, names of files and procedures might change, but the fundamentals are compatible. I show some examples of using PC machines for NFS and NIS as appropriate.
The move to distributed processing and client/server architectures has meant that many users have small, powerful machines on their desk that communicate with a larger server somewhere on a network. The applications the user needs are often located in places other than on their desktop, so some method of accessing remote files (applications and data) is required. Although both Telnet and rlogin enable a user to use a remote machine, neither system takes advantage of the user's desktop machine. Peripheral sharing has also become important as local area networks grow. To help integrate workstations into local area networks, as well as to simplify remote file access and peripheral sharing, Sun Microsystems introduced the Network File System (NFS).
Sun designed NFS so that it would enable machines from different vendors to work together, even if they used different operating systems. Sun published the NFS specifications, enabling other vendors to adopt their own hardware and software to work smoothly with NFS. This results in a completely homogeneous network. Since Sun's introduction, NFS has become a de facto standard among UNIX environments, with strong support in other operating systems, as well.
NFS actually refers to both a product and a protocol. There is an NFS product that consists of a set of protocols for different tasks (these are examined in the section titled "NFS Protocols"). The NFS protocol is the one protocol of the NFS product that deals with file access. To avoid confusion, you should think of the NFS protocol specifically (instead of the entire product set) when NFS is mentioned today.
NFS is now intimately tied with UNIX, and it is shipped as part of the System V Release 4 software version. It is also tied to TCP/IP, which remains the communications protocol of choice for UNIX networks. For other operating systems, NFS is usually an extension that is added at the system administrator's option. UNIX systems use the process nfsd to manage NFS access, with the process started automatically when the UNIX system boots after NFS has been properly configured.
NFS enables an application to read and write files that reside on NFS servers, with the access to the NFS server completely transparent to the application and the user. For developers, NFS requires no extra coding or special handling, which makes it especially attractive. This transparent access to another machine's file structure is achieved by logically attaching the NFS server to the client, a process called mounting.
The NFS server's file system can be attached as a whole, or just a portion of it can be mounted. The directory at which the mount occurs is called the mount point. The concept of shared files similar to that encountered with NFS is sometimes called a distributed file system, although this is a misnomer with NFS.
UNIX has had the capability to mount or attach another file system for a long time. This type of mounting can occur across networks and is transparent to the application and user, as long as filenames take into account the full path name of the mounted file system. The NFS mount is similar to the UNIX mount process.
NFS uses the term client to represent any machine that requests a file from another machine, which is the server. Multitasking operating systems can act as both client and server simultaneously, with processes on the machine accessing files on another machine while others on the network access its own hard disk. Usually, restrictions are imposed as to the files or portions of a file system that can be shared, both for security and speed considerations. Typical NFS installations use personal computers or diskless workstations as clients accessing a more powerful server system. Because personal computer operating systems such as MS-DOS are single-tasking, PCs usually act only as clients, unless they run a multitasking operating system such as Windows NT or OS/2. It is possible to have an entire network of multitasking computers sharing their drives with each other, although in practice this works well only for small networks because of the high density of network traffic required to support all the mounted filesystems.
Because of the need to transfer files quickly, network speed becomes vitally important. When it was designed, the original goal for an NFS-mounted file system was to provide performance equivalent to 80 percent of the performance expected from a locally mounted hard disk. This puts the performance emphasis on both the NFS disk drive and the network system. Typically, NFS disk drives are among the fastest available, specifically to reduce bottlenecks at the drive end. The network hardware and software must be chosen to enable the fastest possible throughput.
Because NFS is UNIX-based, the security offered is rudimentary. For this reason, Sun has introduced Secure NFS, which implements an encrypted messaging protocol for added protection against unauthorized access to NFS-mounted file systems.
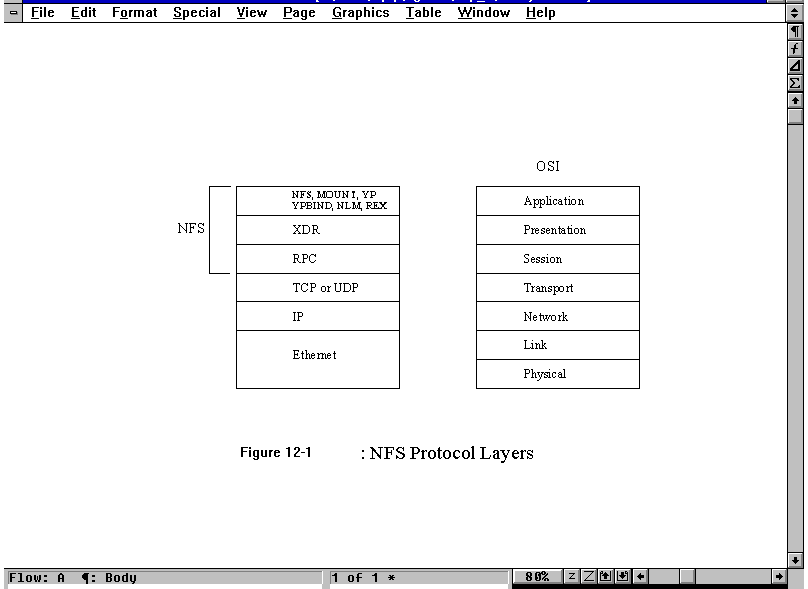
The NFS product comprises several protocols, only one of which is called the NFS protocol. The NFS product protocols are designed as a set of layers, similar to the OSI model. The layers of the NFS product are compared to the OSI layers in Figure 12.1. Each protocol in the NFS product has an Internet RFC dedicated to its specification.
Figure 12.1. NFS protocol layers.
The NFS product is based on the OSI layered model, resulting in protocols that are independent (in theory, at least) from each other and protocols in different layers. The design philosophy is that any single-layer protocol could be replaced with any other one, assuming the functionality of the protocol was the same. To date there are no common alternatives for the two lower-layer products, RPC and XDR, although there are several for the top layer.
Figure 12.1 introduces the RPC (Remote Procedure Call) and XDR (External Data Representation) protocols that I look at now in more detail.
The Remote Procedure Call (RPC) protocol acts as the session layer and as the message exchanger for all NFS-based applications. RPC is composed of a set of procedures that can be incorporated into high-level applications to handle any required network access. The remote procedures are no more complicated to use than local procedures.
Application developers can create their own RPC procedures between a client (the one that issues the request) and a server (the one that processes the request). A group of procedures is called a service. Each server can use only one service, so each service is assigned a program number to identify itself to both the client and the server.
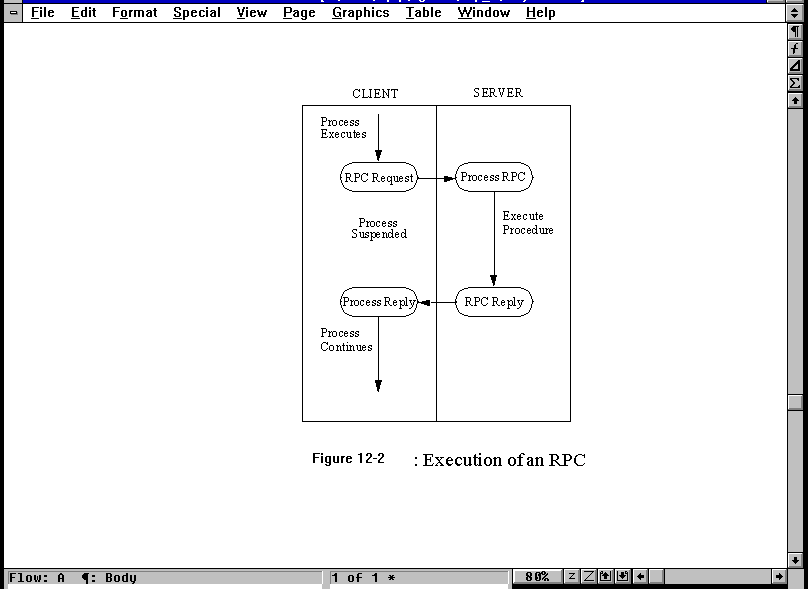
RPC functions over the network between a client and a server. The process followed by an RPC is shown in Figure 12.2. It begins with the activation of the procedure by the client, from which a request message is sent to the server. After receiving the message and extracting the request, the server executes the requested procedure and assembles a response message with the results. Upon receipt of the reply, the client disassembles the message and continues with the application's normal execution. Every step of the procedure is controlled by routines within the RPC library (which is linked into the applications).
Figure 12.2. The execution of an RPC.
RPC messages can be sent using either TCP or UDP (or for that matter, any other protocol that provides the same functionality). Typically, RPC is used with UDP because a connection-based protocol is not necessary and UDP is usually faster. However, UDP does impose a maximum packet size, which can cause some problems with procedures. Also, UDP does not guarantee delivery, so an application that uses UDP must handle reliability issues (usually with a retransmission timer).
The use of TCP offers the capability not only to ignore reliability concerns (leaving that to the TCP software), but also to batch requests. With a batch connection, the client and server agree that the client can send several RPC requests one after another without waiting for acknowledgment or a reply to each. This can be a useful feature with some applications.
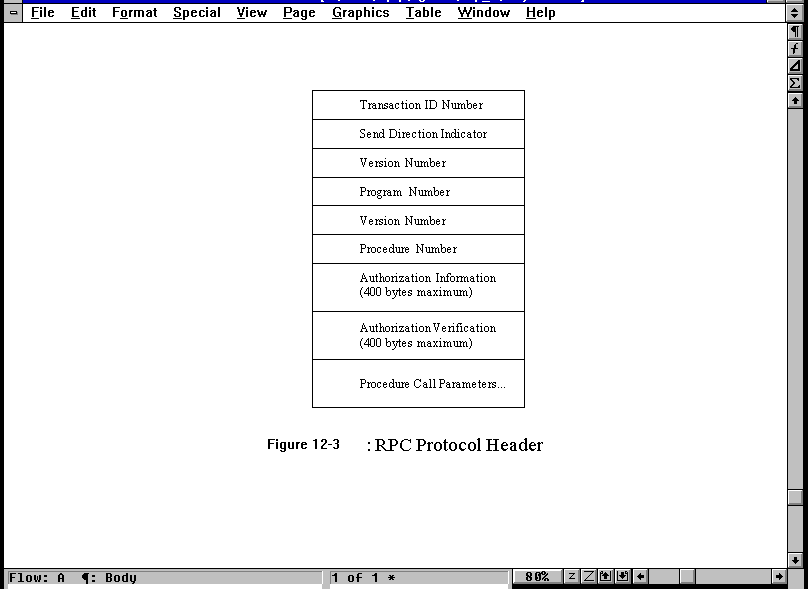
The RPC protocol is used to send requests and replies. The format of the RPC protocol packet header is shown in Figure 12.3, with all fields coded in the External Data Representation (XDR) format (see the section titled "External Data Representation (XDR)" later today). The Transaction ID field is used to match requests and replies and is changed (usually incremented) by the client with each new request. The Direction Indicator field shows whether the message originated with the client (a value of 0) or with the server (a value of 1). The first Version Number is the version of RPC used and the second Version Number identifies the version of the program. The Program Number identifies the service (set of procedures) to use, as mentioned earlier. The Procedure Number identifies the particular procedure in the service.
Figure 12.3. The RPC protocol header.
Some procedures might require a client to authenticate itself to the server, both for identification purposes and for security reasons. The RPC protocol header contains two fields for authentication. The Authorization Information field is for information itself, and the Authorization Verification field is used for the validation. The RPC RFC does not define how authentication is to be performed, leaving it up to the application developer, but it does specify two fields with a maximum size of 400 bytes each. There are currently four types of authentication predefined for use:
The only authentication system that is really secure is the DES method. The other three systems can be readily broken by a knowledgeable developer.
Each service that uses RPC has a program number that uniquely identifies it to the protocol. RPC keeps track of connections using a program number for each, which can be mapped to a program name. In UNIX, this mapping is performed in the file /etc/rpc. A sample /etc/rpc file follows:
portmapper    100000  portmap sunrpc

rstat_svc     100001  rstatd rstat rup perfmeter

rusersd       100002  rusers

nfs           100003  nfsprog

ypserv        100004  ypprog

mountd        100005  mount showmount

ypbind        100007

walld         100008  rwall shutdown

yppasswdd     100009  yppasswd

etherstatd    100010  etherstat

rquotad       100011  rquotaprog quota rquota

sprayd        100012  spray

3270_mapper   100013

rje_mapper    100014

selection_svc 100015  selnsvc

database_svc  100016

rexd          100017  rex

alis          100018

sched         100019

llockmgr      100020

nlockmgr      100021

x25.inr       100022

statmon       100023

status        100024

bootparam     100026

ypupdated     100028  ypupdate

keyserv       100029  keyserver

ypxfrd        100069  ypxfr

pcnfsd        150001  pcnfsd
This file shows the program name and its corresponding program number. The third column, when present, shows a program name that corresponds with the process name in the first column. The program numbers shown in this file are assigned by the RPC RFC and should be consistent across all implementations of RPC.
Connections between a client and server are over ports, each with its own number (port numbers are used in TCP/IP to define a connection). To prevent problems with port allocation using RPC, a port mapper was developed. Without the port mapper, a server could easily run out of available ports with only a few RPC connections active.
The port mapper controls a table of ports and RPC programs using those ports. The port mapper itself has a dedicated port number (port 111 with both UDP and TCP). The ports available to RPC connections are assigned when the RPC program is initiated, at which time these port numbers are sent to the port mapper.
When a client wants to use RPC, it sends a request to the server. This request follows the RPC header format seen in Figure 12.3 and includes the version number of RPC, the service number, and the protocol to be used. The port mapper can then allocate a suitable port number and return that number in a reply message to the client. Once a port number has been assigned for that client, it is maintained, so that all procedure requests come over that port until the application terminates. The port numbers might be maintained over several processes, so the port inquiry needs to be conducted only once between system power cycles.
This procedure does have a drawback: the client must know the server's address. It cannot simply send out a generic request for a server with the services it is looking for. This has been overcome with some newly developed network file systems, although not NFS.
The External Data Representation (XDR) is the method by which data is encoded within an RPC message (or other protocol systems, as well). There is no formal message header or protocol system for XDR, although the XDR RFC does define the method of encoding data.
XDR is used to ensure that data from one system is compatible with others. It might seem that no formal definition is required, but consider the case of an EBCDIC-based machine communicating with an ASCII-based machine. XDR enables both ends to convert from their local data representation to a common format, removing any doubts about the meaning of the data. (EBCDIC to ASCII is not the major conversion problem. Some systems use high bits as significant, and others use low bits. Also, formats for defining types of numbers differ considerably.)
The XDR format uses sequential bits written into a buffer, then formatted into a message and sent to the lower protocol layers. XDR relies on an 8-bit byte, with the lower bytes being the most significant. The RFC defines that all integer data types are converted to 4-byte integers, with an extended 64-bit hyperinteger format available. IEEE 32-bit formats are used for floating-point numbers, where the mantissa is the lower 23 bits, the exponent takes 8 bits, and the sign of the number is 1 bit. Where data takes less than 4 bytes for any type, padding is added to ensure 4-byte lengths.
The NFS protocol is composed of a set of RPC procedures. It is not a protocol in the conventional sense of defining a complex handshaking process between two machines. Instead, it is a method of communicating information about a procedure to be run. NFS uses UDP and has a port number of 2049 assigned. This port number is nonsense; it arises from an error in the original implementation that could not be corrected subsequently because of compatibility issues. Because the port numbers are assigned by the port mapper, this number has no real meaning.
NFS was designed to be a stateless protocol, meaning that the machines using NFS would not have to maintain state tables to use the protocol. Also, it was designed to be robust, meaning that after failures (of a connection or a machine) the system could recover quickly and easily.
The NFS protocol is difficult to describe without introducing some programming, because the system is described in terms of the XDR language. This type of discussion is beyond the scope of this book; for more information, refer to the RFCs. However, it is possible to convey a sense of the protocol's contents through an overview of its capabilities and features.
To understand the NFS procedures that comprise the protocol, it is necessary to examine the data structures and objects in the protocol. NFS defines a set of constants that are used to establish various parameters, such as the number of bytes in a path name, the maximum number of bytes in a read or write request, or the size of an NFS pointer. These are called protocol constants and should be the same for all implementations of NFS.
Several data objects are used by NFS to define files and their attributes. Because NFS deals specifically with files, these objects are important to the protocol. One data object is the file handle (or fhandle), which uniquely identifies a file on the server. File handles are provided in all NFS messages that refer to the file. As with most NFS data types, the file handle is a 32-byte field of free format that is understandable by the server. For example, a UNIX file is uniquely defined by its device major and minor numbers and its inode number. The filename itself is not used.
A data object is used for the file type (called ftype), which defines all the kinds of files known by NFS. These mimic the UNIX file types, including a regular file (any kind of data), a directory (which is a file entry in UNIX), links (which are several pointers under different names to the same file) and both block and character mode files.
Also used is a data structure for the file attributes, called fattr. This defines the permissions of the file, the times of access, the owner, and several other parameters. This is necessary whenever a file read or write is performed, because the attributes must be correct to allow the procedure to continue. (The attributes can be changed by another NFS procedure called set attributes or sattr.)
These data objects can be combined into a larger entity using a discriminating union. A discriminating union is a combination of several data objects that are given a single label. These discriminating unions can be thought of as a label followed by data, which might differ depending on the outcome of a procedure. For example, after a procedure has been executed, a discriminating union might be a label followed by either an error message or the result of the procedure, if it executes properly. The union, though, is referred to by the label and doesn't care about the contents in the data area. This type of structure is used to simplify programming.
Seventeen procedures (and a NULL procedure) are defined within the NFS protocol. These procedures are summarized in Table 12.1. This book doesn't go into detail about the procedures, as they are not relevant to the level of discussion. The RFC covers them all in exhaustive detail.
|
Name |
Description |
|
Null
|
Null procedure
|
|
Fetch file attributes
|
Returns the attributes of a file
|
|
Set file attributes
|
Sets the attributes of a file
|
|
Read file system root
|
Not used; now obsolete
|
|
Lookup filename
|
Returns the file handle corresponding to a filename
|
|
Read contents of link
|
Returns details of symbolic links to a file
|
|
Read file
|
Reads a file
|
|
Write to cache
|
Not used
|
|
Write to file
|
Writes a file
|
|
Create file
|
Creates a new file and returns the new file's handle
|
|
Delete file
|
Deletes a file
|
|
Rename file
|
Renames a file
|
|
Generate link
|
Creates a link to a file (same file system)
|
|
Generate symbolic link
|
Generates a symbolic link (across file systems)
|
|
Create directory
|
Creates a new directory
|
|
Delete directory
|
Removes a directory
|
|
Read directory
|
Returns a list of files in the directory
|
|
Read file system attributes
|
Returns information about the file system |
Programmers might have noticed the lack of any open and close file functions within NFS. This arises from the stateless nature of the protocol. When a file must be opened, the local NFS process handles it, not the remote process. This allows for better control of files and ports after failure of a machine or a connection.
In today's introduction I mentioned that NFS works by mounting an NFS server file system onto a client file system. As you have just seen, however, the NFS protocol is actually about file access and information, not connecting file systems. This file system mounting procedure is dealt with as a separate issue by the NFS product, using the Mount protocol. Mount uses UDP.
The Mount protocol is involved in returning a file handle from the server to the client, enabling the client to access an area on the server file system. The protocol returns not only the file handle but also the name of the file system in which the requested file resides. Mount consists of a number of procedures that facilitate communications between the client and server, designed especially for dealing with files.
A process called mountd takes care of handling the mount protocol at both ends of a connection. The mountd process maintains a list of machines and path names that are involved in a mount operation. Once a mount has been performed, NFS can continue operating without referring back to Mount at all. This lets Mount continue to modify its internal tables without affecting ongoing sessions. This can cause a problem if a client crashes and reconnects. The server still has the original connections listed in its internal Mount tables. To correct this problem, most NFS clients send a command (called UMNTALL, or unmount all) to all NFS servers when they boot.
As mentioned earlier, the Mount protocol consists of a set of procedures. These are summarized in Table 12.2 and are self-explanatory.
|
Name |
Description |
|
NULL
|
Null
|
|
MNT
|
Mounts a file system and returns the file handle and file system name
|
|
UMNT
|
Unmounts a server file system, deleting the entry from the Mount table
|
|
UMNTALL
|
Unmounts all server file systems used by the client and updates the Mount table
|
|
EXPORT
|
Provides a list of exported file systems
|
|
DUMP
|
Provides a list of the file systems on the server that are currently mounted on the client |
Some versions of NFS enable an automount capability, in which the remote file systems are mounted only when required. This prevents them from being attached for extended periods of time and simplifies administration. The process of automounting is completely transparent to the user.
The automount capability is built upon NFS's procedures, but it performs a few clever tricks. The automounter is not part of NFS but is an application that sits on top of it. Symbolic links are the key to the automounter's operation.
Occasionally a system administrator wants to prevent access to an NFS-available file system. Such instances occur regularly during maintenance, software updates, or to protect data during a particular process. UNIX has the capability to lock a particular file by changing permissions, and the same can be done for file systems to some extent, but it would seem intuitive that locking a file system is more involved than simply locking a file or two. The capability to lock file systems from access was not developed with the original NFS product but was implemented as a parallel service after NFS became more widely available.
File system locking is handled by several protocols and procedures, involving a few daemon processes. In the original file locking system developed by Sun Microsystems, a lock daemon called lockd was used. This requires that every RPC activity that involves a lock communicates with the process, even when it is on another machine. The communications between RPC and lockd use a protocol called Kernel Lock Manager (KLM), which rides on UDP.
Whenever a lock procedure is called, lockd decides whether it can handle the task on the local machine or whether messages have to be sent to remote lockd processes (on other machines). Communications between different lockd processes are through another protocol called the Network Lock Manager (NLM). There are several versions of both KLM and NLM in use, with implementations available for most hardware platforms.
A process called statd (status monitor) monitors the state of locks and handles queries against a locked file system. This is necessary so that a new query against a locked file system can be queued (if it is locked for a short time) or rejected (if the file system is locked for a while).
There are several built-in protection systems for file locking, such as automatic timers to prevent infinite locking after a machine crash, conflicting requests for locks, and a short period for completion of existing procedures before a lock is completed. These are all defined and explained in the RFC.
The Remote Execution Service (REX) is designed to enable a user to run commands on another machine with full environment variables, without incurring the overhead of processes such as Telnet, rlogin, or rsh. REX uses a daemon called rexd that runs on the server and employs NFS's services. (Remember that each machine can be both client and server, so most multitasking machines on a network can run rexd.) REX is commonly used when some applications are installed on only a few machines but should be available to all users.
REX has an important advantage over the other UNIX utilities for this type of service. It enables access to the local machine's data while executing the command on the remote. This enables a user to run an application on another machine while accessing data files on the local machine. It also enables another machine's resources to be used without starting a user shell process or logging into the remote machine.
To run an application or execute a command on a remote machine, the REX on command is used. The syntax adds the name of the machine on which the command is to be executed and the command to run. The following code gives an example of this:
$ hostname

tpci_hpws4

$ cat file1

This is the file "file1" on "tpci_hpws4".

This is the client machine.

$ on merlin hostname

merlin

$ rsh merlin cat file1

cat: cannot open file1

$ on merlin cat file1

This is the file "file1" on "tpci_hpws4".

This is the client machine.
This example shows the remote machine executing a cat command on a local file. When the remote machine runs commands using on, an identical environment to the client is established on the remote, including user and group IDs and environment variables. So, if the remote machine in the previous example had a file called file1, but it was not in the search path of the process running the command, the system would still refer back to the client for the file.
Two utilities available to NFS users are simple examples of RPC programs. They are also useful to the user who wants to check the status of connections and the load on a remote machine.
The spray program is similar to ping in that it sends a batch of messages across the network and waits for replies. Several supported options can configure the use of spray. When the spray command is issued with the -c option, it sends a supplied number of datagrams to the remote machine and times the results. A typical use is shown here:
$ spray -c 200 beast

sending 200 packets of length 86 to beast...

   in 18.3 seconds elapsed time,

   4 packets (2.00%) dropped by beast

Sent:  10 packets/sec, 912 bytes/sec

Recd:   9 packets/sec, 862 bytes/sec
The rusers program gives you an idea of who is logged into remote machines. A typical output is the following:
$ rusers

beast.tpci.com       tparker  bsmallwood  rmaclean

merlin.tpci.com      ychow  etreijs  tgrace

tpci_hpws3.tpci.com  tparker  sysadm

tpci_hpws4.tpci.com  pepper
As shown, the output from the rusers program includes the machine name and the list of users on that machine. Some implementations support options for rusers, whereas some have slightly differing output.
Many people love using the NFS service when they are faced with it as a user but are scared to configure it when acting as a system administrator. The general assumption is that the process must be convoluted, complex, and require a lot of knowledge about the operating systems. For this reason, many people don't bother with NFS, which is a shame because it is one of the most useful services TCP/IP has to offer. As you see in this section, it is not difficult to implement an NFS network.
I configure NFS on two different operating systems to show the general process. I use an SCO UNIX machine as an example of a UNIX installation, and a Windows for Workgroups system to show setting up a client and server NFS PC system. I start with the UNIX machine, because UNIX is most often associated with NFS servers.
The NFS service makes extensive use of the RPC service. For this reason, the RPC server daemon must be running for NFS to be implemented. On some UNIX systems you can check whether RPC is active by issuing this command at the shell prompt:
rpcinfo -p
You should see a list of all the RPC servers currently running on your machine. If RPC is running properly, you see four rpcbind listings (two for UDP and two for TCP) and an entry for pcnfsd, the NFS daemon. This command doesn't show all this output for some versions of UNIX, including SCO UNIX.
For SCO UNIX, NFS is started and stopped by a script called /etc/nfs. This can be linked into the startup routines to load NFS automatically when the system boots by linking the /etc/nfs file to the file /etc/rc2.d/Sname. To shut down NFS properly, you also need to link /etc/nfs to the file /etc/rc0.d/Kname. (On other UNIX implementations the filenames change, but the general approach is the same.) If you want to start and stop the NFS daemon manually, you can do this with these commands:
/etc/nfs start

/etc/nfs stop
The /etc/nfs command starts up and shuts down the NFS server daemon when the appropriate command is issued. When you issue the start command, the daemons that are activated are echoed to the screen:
$ /etc/nfs start

Starting NFS services: exportfs mountd nfsd pcnfsd biod(x4)

Starting NLM services: statd lockd
With a stop command, you see a message that the daemons and server are shut down:
$ /etc/nfs stop

NFS shutdown: [NFS Shutdown Complete]
For a filesystem on a SCO UNIX machine to be available to NFS clients on other machines, the filesystem must be listed in the UNIX file /etc/exports. With some versions of UNIX, the NFS daemons are started automatically if the /etc/exports file exists during boot time. This invokes a program called exportfs that sets the filesystem as available for NFS use. If any changes are made to the /etc/exports file while the system is running, you can issue another exportfs command, or simply reboot the machine, to make the changes effective.
The format of the /etc/exports file is as follows:
directory [ -option, option ... ]
The directory is the pathname of the directory or file to be shared (exported, in NFS terminology) by NFS, and the options are one of the following:
ro: Export the directory as read-only. (The default value is to export as read-write.)
rw=hostnames: Export the directory as read-mostly, which means read-only to most machines but read-write to machines specifically identified.
anon=uid: If an NFS request comes from an unknown user, use uid as the effective user ID for ownership and permissions.
root=hostnames: Gives root access to the root users from a specified machine.
access=client: Gives mount access to each client listed. A client can be a host name or a net group.
An example of an /etc/exports file helps show the use of these options. A pound sign (#) on a line means a comment. Here's a sample /etc/exports file:
/usr/stuff -ro            # export as read-only to anyone

/usr   -access=clients    # export to the group called clients

/usr/public               # export as read-write to anyone
NFS is now ready for use on the SCO UNIX server. You might notice that SCO UNIX creates a new file called /etc/xtab that contains the filesystem information from the exports file. You should not modify the contents of the /etc/xtab file or the NFS server cannot function properly. The /etc/xtab file is generated by the exportfs command.
Some versions of UNIX use the share command to set up a directory for export. (SCO UNIX does not support the share command because the functions are duplicated in the /etc/exports file.) The syntax of the share command is as follows:
share -F nfs -o options -d description path
The -F option indicates that the directory or files given in the path are to be set as NFS filesystems. The options following -o set the type of access in the same way as the SCO UNIX options for the /etc/exports file shown earlier. The -d option can be followed by a descriptive statement used by clients to describe the export filesystem. For example, to share the directory /usr/public as read-write (the default), you could issue this command:
share -F nfs -d "Server public directory" /usr/public
Options can be combined, as shown in this example:
share -F nfs -o ro=artemis,anon=200 -d "Book material" /usr/tparker/book
This command shares the directory /usr/tparker/book, which is tagged with the description "Book material", with everyone as read-write except for a machine called artemis, for which it is read-only. Any anonymous users accessing the system use UID 200.
The share command by itself usually shows a list of all filesystems that are exported.
UNIX can mount an NFS exported filesystem from another machine with the mount command. The syntax for mounting an NFS filesystem is as follows:
mount -F nfs -o options machine:filesystem mount-point
The -F option tells the mount command the filesystem is an NFS filesystem; machine:filesystem is the name of the remote machine and the filesystem to be mounted; and mount-point is the location in the current filesystem where the remote filesystem is to be mounted. Some versions of UNIX change the syntax a little. For example, SCO UNIX uses a lower case f and uppercase NFS to indicate the type. Check the man pages for the exact syntax on your version.
In use, mount is easy to work with. For example, the command
mount -F nfs artemis:usr/public /usr/artemis
mounts the filesystem /usr/public on the remote machine called artemis onto the local machine in the directory called /usr/artemis. The mount-point (in this case /usr/artemis) must exist for the mount to succeed.
The -o optional component of the mount command can be used to set options from the following list:
rw: Sets the mount to read-write (the default value)
ro: Sets the mount to read-only
timeo=x: Gives a timeout value in tenths of a second to attempt the mount before giving up
retry=x: Retries x times before giving up
soft: Forces the client to give up the mount attempt if an acknowledgment is not received from the remote machine
hard: The client continues trying to mount the filesystem until successful
intr: Enables the keyboard to interrupt the mount request; otherwise, the attempts go on forever
Any of these options can be combined in one mount command, as they could be for the share command. For example, the command line
mount -F nfs -o soft,ro artemis:usr/public /usr/artemis
tries to mount the /usr/public directory on artemis as read-only, but it gives up if the mount attempt is not acknowledged by artemis. The mount command by itself usually shows all mounted filesystems.
Several TCP/IP suites and application packages for Windows 3.x, Windows 95, and Windows NT provide NFS support. One of the widest used is NetManage's ChameleonNFS, which can be used under any of the Windows operating system versions. ChameleonNFS enables a Windows machine to act as both client and server for NFS file access. In other words, another machine can access files on the ChameleonNFS machine, and the ChameleonNFS machine can access files on other NFS-equipped machines.
Implementing NFS access on a Windows machine can vary from very complex to very easy, depending on the software package that provides the NFS capabilities. Some available NFS products don't offer server capabilities, enabling only NFS client behavior on the installation machine. Carefully check the software before you purchase or install it to ensure you are getting a product that meets your NFS requirements. In this section I continue with ChameleonNFS as the example NFS software, because it is relatively easy to install, configure, and use. I use Windows 3.11 as the operating system example.
ChameleonNFS relies on a software daemon called Portmapper, which maintains a list of all currently registered network services (including NFS). Portmapper is loaded automatically when the Windows machine boots in most installations. ChameleonNFS is set to record mounted drives to the WIN.INI file (for Windows 3.x at least) whenever a Windows session is saved. This enables currently mounted drives to be remounted automatically when the next Windows session is started.
ChameleonNFS server activities such as administration and configuration are conducted through the NFS icon in the NetManage program group. The sole exception is printer handling for network devices, which is handled through the Printer icon on the Control Panel. NFS client activities are done through normal Windows applications, such as the File Manager and Control Panel. Drives are mounted and unmounted through the File Manager, whereas all other options are handled through the Network panel in the Control Panel.
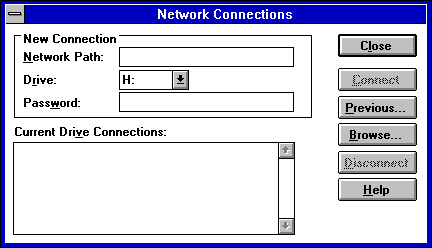
Once installed, ChameleonNFS lets you mount a remote directory on an NFS server from the File Manager. Select the Network Connections option from the Disk pull-down menu. This displays the Network Connections dialog shown in Figure 12.4. The remote machine name and the directory to be mounted are specified in this dialog. The mounted filesystem is usually mounted as another drive, not as part of an existing drive's filesystem.
Figure 12.4. The Network Connections dialog lets you mount a remote filesystem using NFS.
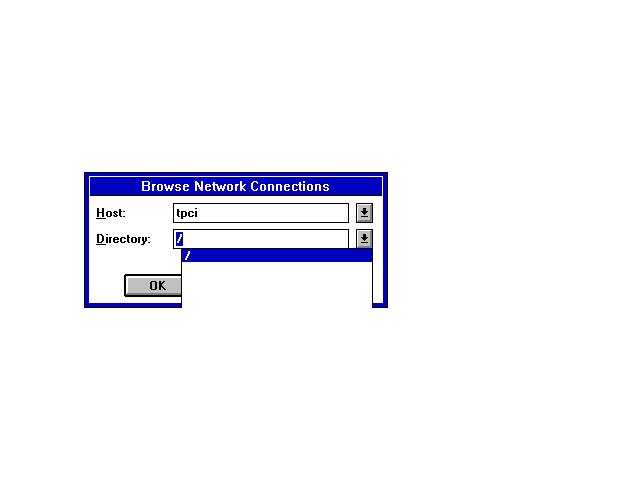
If you want to see all the filesystems that are available for mounting on a remote machine, use the Browse button. The remote machine name and all the filesystems available are listed, as shown in Figure 12.5. In Figure 12.5 the only filesystem that is showing as available on the machine called tpci is the root filesystem, which means the entire filesystem on the remote. You can't tell from this window whether it is set for special access rights such as read-only.
Figure 12.5. When you specify the host name in the Browse dialog, all that remote's NFS filesystems are listed.
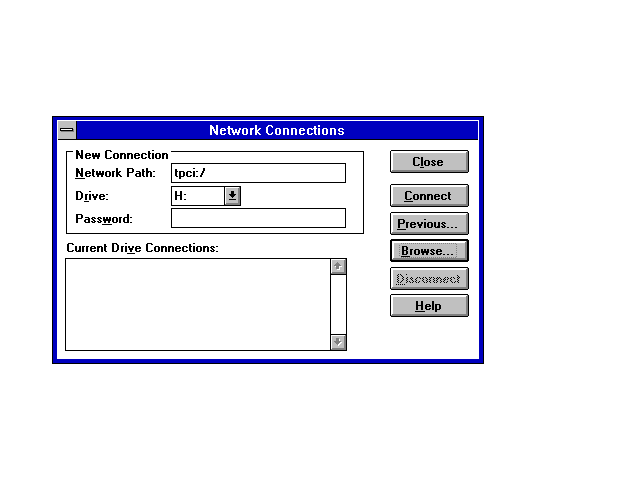
Clicking the OK button after the remote machine name and directory name are filled in mounts the remote filesystem at the location you indicate in the window, as shown in Figure 12.6. This mounts the remote machine's root directory as drive H on the local machine. When you click OK to close the NFS dialog, the remote machine's filesystem is available from the File Manager. The drive icon shows that it is a network drive.
Figure 12.6. This window shows that tpci's root directory is to be mounted as drive H on the local machine.
To disconnect an NFS-mounted drive, use the Disconnect button on the Network Connections dialog. The drive icon should be removed from the File Manager to show that the mount is no longer in effect.
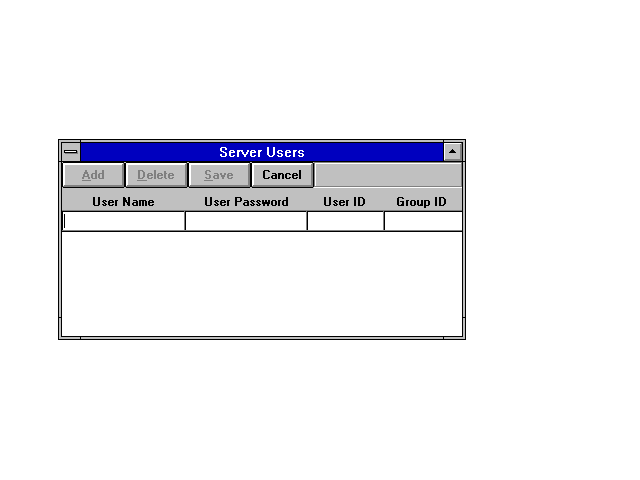
ChameleonNFS can be used to share PC drives or directories with other users on the network. To share a drive, create a list of users who have access to the drive, unless everyone can mount the drives. The user access list is maintained under the NFS icon with ChameleonNFS. Start the NFS server process by clicking the NFS icon in the Chameleon program group. This displays the NFS main window. Clicking the Users menu item on the NFS window opens the Server Users window, shown in Figure 12.7. From here you can add and manage all access to your NFS available drives. To enter a user, type the name, any password you want them to use (if you want a password), and a group and user ID number. Click the Add button, and the entry appears as part of the user list.
Figure 12.7. The Server Users window lets you set access rights to your NFS drives.
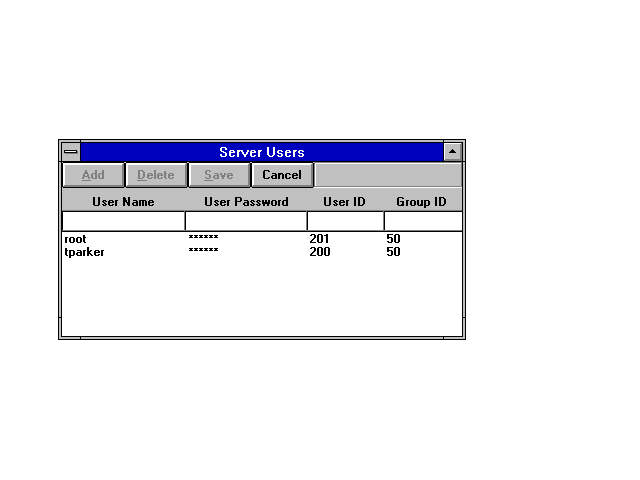
When you have entered all the users, click the Save button to write the entries to the disk. If you don't save the table, any changes are lost. Figure 12.8 shows two users on the access table.
Figure 12.8. Two users are allowed to access the local machine's NFS drives.
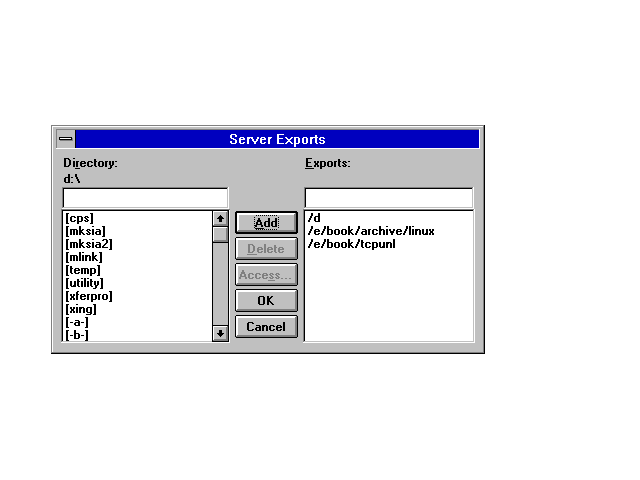
Next, you need to set the drives and directories that can be exported by other clients. Use the Exports menu item in the NFS window to display the Server Exports window. Use the directory browser to move between the drives and directories, selecting the ones you want to export. Click the Add button to enter the drive and directory combination to the export list.
Figure 12.9 shows the Server Exports window with two specific directories and one entire drive set to be exported. For each drive or directory you can set access rights by clicking the Access button. This displays the Access dialog, which you can use to select the proper permissions and access rights.
Figure 12.9. The Server Exports window with directories and drives defined for NFS access.
Once the access permissions are set, a remote client can access your NFS drives. The remote user is prompted for a password if you have set your system to require one.
The Yellow Pages (YP) protocol is an RPC application layer service (like NFS) that provides a versatile directory service. Because of copyright restrictions, Yellow Pages was renamed to Network Information Service (NIS), although both terms are in common use. NIS was developed for several reasons, but the one that affects users the most is access permissions. The effect these permissions have on users is generally transparent except for one major advantage.
If you are a user on a large network and you tend to connect to other machines frequently (through Telnet or FTP, for example), you must maintain accounts on each machine you connect to. Thus, you would need user accounts on every machine you could conceivably want to access. Maintaining the passwords on a large number of machines is awkward, because you must log into each one and perform password changes. NIS was developed to enable one single, central user file to be shared over the network, requiring only a single entry to enable access to all machines (unless specific restrictions are imposed), and simplifying a password change on all machines to one step.
In RPC terms, this combination of user ID and password works on the RPC authentication procedures. RPC uses the user and group IDs to grant access to files, so it is necessary for the client and server's user and group IDs to match. Without NIS this could be very difficult to implement because each machine's user file might have the same names, but their user IDs might not coincide. Worse, another user with a matching user ID on another machine could access files on your machine as though he or she were logged in as you.
NIS is a distributed access system in that each machine on the network that uses NIS accesses a central server, called the NIS master or ypmaster (depending on the version), for access information. On larger networks, to spread the load, and for all networks as a backup contingency, several other machines are designated as slaves or ypslaves that maintain up-to-date access information. In case of a failure of the master server, a slave takes up the functions. NIS uses both TCP and UDP for communications.
The NIS protocol has a set of procedures defined within the RFC. These enable a search for master servers, access to the user files, and system management functions. Another procedure is used to transfer copies of the master files. Several machines are grouped together into one NFS subnetwork, called a domain (not to be confused with the Internet domain). Each domain has master and slave machines.
NIS keeps the access information in a set of maps, each map corresponding to a particular area or domain of a network. This allows for several groups to use the same NIS master but have different access permissions. The NIS maps do not have to correspond to DNS domains, enabling more versatility in configuration. Maps consist of a set of records in ASCII format, each with an index key for fast lookup. The index key is usually the user name. The records have the same structure as normal user files (such as UNIX's /etc/passwd), both for compatibility and for simplicity.
NIS is not restricted to the users of a system. Any file can be set up to use NIS, such as the list of machines on a network (UNIX's /etc/hosts file). Thus, only one change needs to be made to these files on any network. A set of aliases also can be managed by NIS.
Several NIS-specific commands are involved with the protocol, although most system administrators set up aliases to minimize the impact on users. For most users, only one command is necessary on a regular basis. For UNIX systems, this is the command yppasswd to change a user's password. This is usually aliased to passwd, the normal password change command. Application developers might have to examine the NIS protocol in more detail when writing client/server code that runs on an NIS-based system, but the effects of the distributed system are usually transparent.
Earlier today you saw how NIS can be used to provide network-wide access to files that would normally be local, offering greatly improved access for users and administrators. With NIS active, you don't need to maintain a separate current /etc/passwd file on each UNIX system; instead, you can use the NIS master password files to enable global access to any machine on the network.
In this section I look at how to set up NIS on a simple UNIX network. There are many variations of network architecture and configurations, some of which get awfully complex for a network administrator. Although the principles of setting up NIS and NIS domains are the same for all networks, some extra steps are required on very complex setups. For the most part, I look at the basics only. The files that are normally handled by NIS are as follows:
|
/etc/ethers
|
Ethernet MAC to IP address mappings
|
|
/etc/group
|
Group access information
|
|
/etc/hosts
|
IP address to hostname mappings
|
|
/etc/netmasks
|
IP network masks
|
|
/etc/passwd
|
User access information
|
|
/etc/protocols
|
Network protocol and number mappings
|
|
/etc/rpc
|
RPC numbers
|
|
/etc/services
|
Port number to TCP/IP protocol mappings |
I look at the most commonly used files as I set up the NIS master and NIS slave, as well as looking at what has to be changed on any client machines that want to use NIS.
NIS domains are usually assigned to group machines together with an NIS master and one or more NIS slaves as backup. An NIS domain doesn't have to be the same as an Internet domain, although for most networks they are identical (in other words, the entire network is the NIS domain). The NIS domain has to have a name, which can also correspond with your Internet domain name. Alternatively, you can set up subsidiary domains for small logical groups in a large corporation, such as domains for accounting, research and development, and marketing.
To set up an NIS domain, you need to decide on the domain name and know the IP address of the NIS master and any NIS slaves. If you have more than one NIS domain established, you need to know which machines are handled by which NIS master. Each machine on the domain (whether one or many domains are established) must be entered into a configuration file to enable the client machine to use NIS.
To set up the NIS domain, you need to log into each client machine on the network and set up the domain name with the following command:
domainname domain
domain is the domain name the machine uses. You need to be logged in as root or an administrative account with access to the root utilities to set these values. Because this type of command is effective only until the machine is rebooted, it is better to enter the domain name in one of the startup rc scripts. These differ for each version of UNIX, so you should check your rc commands to find out where to embed the domain name. Usually it is in a file under the /etc/rc.d directory.
NIS uses several daemons on the server and on all clients to enable the NIS system. On the NIS master and any NIS slaves, the daemon is usually called ypserv. The ypserv daemon waits for incoming client requests for service, then handles them.
On the clients, the process ypbind is used. This is responsible for connecting with the NIS master when the machine boots and determining any resolution steps necessary to handle logins and other network configuration information handled by NIS. The process of having ypbind connect to the NIS master and establish procedures is called a binding, because the client is bound to the master for requests.
The binding process begins with ypbind sending out a broadcast message for any NIS masters on the network to respond with their IP address and the port number to send requests on. If more than one NIS master responds to the request, only the first received reply is used. If for some reason ypbind finds it isn't getting replies from the NIS master, it assumes that the master has crashed and retransmits a request for a master.
You can find out which NIS master any client machine is bound to with the command ypwhich. It usually responds with the name of the NIS master, as shown here:
$ ypwhich

merlin
Setting up an NIS master is usually straightforward. Begin by verifying the existing files on the master machine, such as /etc/passwd and /etc/group, to ensure that the information is accurate and current. You should remove any expired or unwanted accounts, for example, and verify that all the login directories and commands are correct. While you are examining the /etc/passwd file, check to make sure that all accounts have passwords. If they don't, either assign a password or remove the account. With a network-wide NIS system in place, anyone can exploit these security holes to gain access to any machine on the network, including the NIS master and gateway machines.
Once the files are ready for NIS map generation, make sure you are logged in as root (to set the proper ownerships and ensure full access to the filesystem). The NIS maps are generated from the standard UNIX files, using the ypinit command with the -m option. The -m option indicates that this machine is the NIS master. From the root prompt, issue the following command:
/usr/sbin/ypinit -m
The path to the ypinit program might be different on your UNIX system. Check the path if the command produces an error message when trying to execute.
When the ypinit command executes, it scans all the NIS files named in the file /var/yp and produces the NIS maps that are used by the client processes. The /var/yp file might have a different directory name on some systems, such as SCO UNIX, which uses /etc/yp as a directory for all NIS files. Check your UNIX system documentation or man pages for proper file locations. The /var/yp file contains a list of all the maps to be generated, and usually you do not have to make any changes to this file.
A new directory (usually called /var/yp/domainname, where domainname is the NIS domain name) is created. The maps are placed in this new directory. If you are setting up more than one domain all handled by the same NIS master machine, the maps for each domain are beneath the domain name's subdirectory.
As the last step in ypinit, you are asked which machines are NIS slave servers, at which point you should enter their names. The slave names are saved in a file in the domain directory.
After the maps have been generated properly, you can start the ypserv daemon. It is best to automate the startup by editing the startup rc files to do this for you when the machine boots. There is a section in an rc file (usually the one that starts RPC) that looks like this:
if [ -f /etc/yp/ypserv -a -d /var/yp/`domainname` ]

then

  /etc/yp/ypserv

fi
This script checks for the existence of the directory /var/yp/domainname, where domainname is the domain name for your NIS domain. The entry on the first line where domainname is located must be in single back quotes, which means the shell should execute the domainname command and use the results. If the directory exists, the ypserv daemon is started. You should replace the directory paths with those used by your UNIX system.
To manually start the ypserv daemon, log in as root and issue the command
/etc/yp/ypserv
or whatever the path to your ypserv daemon is.
Next, you need to start the ypbind daemon on the server, too (otherwise, ypserv can't find the maps). Again, this is usually done through the rc startup scripts with an entry like this:
if [ -d /var/yp ]

then

  /etc/yp/ypbind

fi
Again, you should verify that the directory path is correct. You can start the ypbind daemon manually by issuing it on the command line when logged in as root. Make sure the directory path is correct when you do so.
If you want to perform a quick test of the NIS daemons, issue a command like this one at the command line:
ypmatch tparker passwd
The ypmatch command asks NIS to use the maps to match up the next argument with the map of the third argument's name. In this example, ypmatch is instructed to look in the passwd file (passwd is the alias to passwd.byname) for the entry for tparker. You should get back the line that matches. You can use any combination of map alias and entry that you know exists to test the NIS server daemon.
To set up an NIS slave, the NIS master must be configured and running. When you are sure the master is operational, log in as root to the machine to be set up as the NIS slave. The domain name of the slave must be properly set before the configuration can proceed, so check the startup rc commands for the entry that sets the domainname variable or use the domainname command to set the domain name.
To set up the NIS slave and propagate the NIS files from the master to the slave, issue the command
/etc/yp/ypbind
substituting for whatever path is correct on your system. Check that the binding to the master is correct by issuing the ypwhich command. It should return the NIS master name.
Finally, issue the command
/etc/yp/ypinit -s servername
where the path is correct and servername is the name of your NIS master. The ypbind -s option sets the local machine up as a slave. The ypbind command sets up directories on the local machine and transfers all the maps from the master to the slave.
After the setup is complete, you can test the slave setup with the ypmatch command, as shown in the previous section.
To update the maps on the slaves at regular intervals, the ypxfr command is used on the slave, followed by the name of the map to be transferred. For example the command
ypxfer passwd.byname
transfers the passwd.byname file from the master to the slave. Most administrators create a set of cron entries for transferring all the NIS files at regular intervals (such as nightly). You can also use a script file executed by a network administrator.
Setting up an NIS client requires that you have the domainname set properly, either with the domainname command or an entry in the rc startup files, and that the ypbind command has been issued properly and the NIS client is bound to the NIS server.
As mentioned earlier, when an entry in the /etc/passwd or /etc/group file must be searched for a match, the local files are examined first, then the server is queried if no match is found. To instruct your client to go to the NIS master to match a login, you need to add the following entry to the bottom of the /etc/passwd file:
+:*:0:0:::
If you know the format of the /etc/passwd file entries, you will recognize this as a legal entry with no information specified. The plus sign in the username field is to instruct ypbind to query the NIS master. This is called a marker entry. The plus sign entry can be anywhere in the file. When it is reached, NIS is used, then the file is read as before if no match has been found.
RPC and NFS have two primary administration tools available for providing status updates and indications of trouble within the system: rpcinfo and nfsstat. Usually these tools are not available to end users, although it is useful to know of their existence and their role in monitoring NFS and RPC.
Running any single tool is usually not sufficient to isolate a problem. Often one tool reports a problem with a port, but upon closer examination it is found that the port is functioning but the process at the other end died. Therefore, these tools are designed to be used as a complement to each other until an accurate diagnosis can be reached.
The rpcinfo program monitors the port mapper of the machine on which it is running, and through the network, the port mappers of servers. Because the port mapper is the program that controls access to RPCs, this type of information is important in tracking problems. The rpcinfo program can display the contents of the mapping tables, showing the port and program numbers for each connection, and can activate remote servers for testing a connection.
Typically, rpcinfo is called with the -p option to show the list of RPC programs that are currently tracked by the port mapper. An optional machine name can be added to display only connections with one machine. A typical output from the rpcinfo program is shown here:
$ rpcinfo -p

   program vers proto   port

    100000    2   tcp    111  portmapper

    100000    2   udp    111  portmapper

    100008    1   udp   1026  walld

    150001    1   udp   1027  pcnfsd

    150001    2   udp   1027  pcnfsd

    100002    1   udp   1028  rusersd

    100002    2   udp   1028  rusersd

    100024    1   udp   1029  status

    100024    1   tcp   1024  status

    100020    1   udp   1034  llockmgr

    100020    1   tcp   1025  llockmgr

    100021    2   tcp   1026  nlockmgr

    100021    1   tcp   1027  nlockmgr

    100021    1   udp   1038  nlockmgr

    100021    3   tcp   1028  nlockmgr

    100021    3   udp   1039  nlockmgr
In case of a problem contacting the port mapper, rpcinfo returns an error message. In such a case, the port mapper is not functioning correctly and there may be no contact with other machines. A check using ping verifies this. An example of this kind of fatal error message is shown here:
$ rpcinfo -p

rpcinfo: can't contact port mapper:

RFC: Remote system errer -125
Specific connections can be tested with rpcinfo by using the machine and process name, as the following example shows:
$ rpcinfo -u merlin walld

program 100008 version 1 is ready and waiting
Note that the -u option is used for UDP connections, whereas -t must be used with TCP connections. In this example, the client rpcinfo sent a request to the program specified and waited for a reply. A successful reply results in the message shown here. If a reply is not received before a timer expires, an error message is displayed.
In the previous sample output, there is a process called pcnfsd, which is an RPC server developed for use with MS-DOS based machines. It handles access rights and spooling services for the DOS side, while simplifying the DOS machine's access to NFS services.
The nfsstat program, as its name suggests, provides statistics about the number and type of RPC requests that are made. It is usually called without an option, although several exist (depending on the implementation and version) to show specific statistics or sample only certain parts of the connection.
The output from nfsstat is shown here for a typical small network:
Server rpc:

calls      badcalls   nullrecv   badlen     xdrcall

10465      0          0          0          0

Server nfs:

calls      badcalls

10432      0

null       getattr    setattr    root       lookup     readlink   read

1 0%       24 0%       1 0%      0 0%       10123 0%   0 0%       5 0%

wrcache    write      create     remove     rename     link       symlink

0 0%       2 0%       0 0%       1 0%       0 0%       1 0%       0 0%

Client rpc:

calls      badcalls   retrans    badxid     timeout     wait      newcred

8273       2          0          0          0           0         0

Client nfs:

calls      badcalls

8263       0

null       getattr    setattr    root       lookup     readlink   read

1 0%       24 0%       1 0%      0 0%       10123 0%   0 0%       5 0%

wrcache    write      create     remove     rename     link       symlink

0 0%       2 0%       0 0%       1 0%       0 0%       1 0%       0 0%
The output from nfsstat is useful for diagnosing connection problems. The value shown as badcalls shows the number of defective RPC message processed by the system. The values for nullrecv and badlen show the number of empty or incomplete messages. The value for xdrcall shows the number of errors in understanding messages.
For the client side, badxid shows the number of received messages that did not match with a sent request (based on the identification numbers). The timeout and retrans values show the number of times a message had to be resent. If these numbers are high, it usually means the connection is too slow or there is a fault with UDP. The wait value shows the number of times a process had to be delayed because of a lack of available ports.
These types of statistics are useful for configuring RPC properly. System administrators can adjust (tweak) values for the NFS system and monitor their effects on performance over time.
The Network File System has a reputation for being complex and ornery. It is neither. Instead, NFS is an elegant solution to a problem and one in common usage. Today I have examined the concept and basic architecture of NFS, hopefully without getting bogged down in the details.
I have also shown you how NIS works, and how to set it up on a network. Although every network is not necessarily a target for NIS, it is a very handy service that is part of the TCP/IP family.
What does NFS do, in one sentence?
NFS enables an application to read and write files residing on remote machines as though they were on the local filesystem.
Define client and server as used in NFS.
Despite complex definitions from the computer industry, this one is really easy. A client issues a request. A server answers it.
What is the role of RPC in NFS?
The Remote Procedure Call protocol handles message exchange between NFS-based systems. It is a set of procedures that can be called by clients.
What does a port mapper do?
The port mapper provides a correlation between the ports on a machine and the applications that use them.
What does the Kernel Lock Manager do?
The Kernel Lock Manager is involved in file locking, preventing access to files or filesystems. A file lock request is issued by clients when they want exclusive access to a file. The Kernel Lock Manager handles file lock requests.
![]()
![]()
![]()
![]()